It’s one of the most stressful situations a Southern California homeowner can face. You step outside after a Santa Ana wind event, a winter rain, or a summer thunderstorm and find that one of your trees – or a neighbor’s tree – has come down across the property line. The trunk is in two yards. The canopy is on a fence. Maybe a branch has clipped a roof. And now you have to figure out whose problem this is, who pays for what, and what to do in the next hour to keep things from getting worse.
The short answer is that California has specific rules about cross-property tree falls, and the steps you take in the first 24 hours significantly affect both your safety and your insurance claim. Here’s the practical breakdown.
Step 1 – Make Sure Nobody Is in Danger
Before anything else, check for the immediate risks. The most serious ones, in order of urgency:
- People or pets near the fallen tree. Get everyone clear of the canopy and any hanging or partially detached limbs that might still drop.
- Contact with power lines. If any part of the tree is touching, leaning on, or near electrical service drops, do not approach. Call Southern California Edison (or your local utility) immediately to report it. The line has to be confirmed de-energized before anyone goes near the tree.
- Gas line damage. If you smell gas, hear hissing, or notice damaged piping where the tree came down, evacuate the area and call your gas utility (typically SoCalGas) and 911.
- Structural damage to your home. If the tree hit the house, do not enter compromised areas until the structure has been assessed. Roof collapse risk increases the longer a heavy tree sits on a damaged truss system.
- Blocked emergency access. If the tree is blocking the only access to the property, note it – emergency services need to know if they can reach you.
Until these immediate hazards are addressed, nothing else matters. Don’t start documenting, don’t start cleanup, and absolutely don’t start cutting anything yourself. Get safe first.
Step 2 – Document Everything Before Anything Moves
Once the immediate dangers are handled, your most important task – before anyone touches the tree, before any cleanup begins – is documentation. This is what your insurance claim will live or die on. What to capture:
- Wide-angle photos of the entire scene from multiple angles, showing the tree, the property line, and any damage.
- Close-ups of damage to structures – roof shingles, gutters, fences, sheds, vehicles, pool enclosures.
- Photos of the trunk and root ball, particularly any exposed root system on the side opposite the lean (this often shows root failure that supports a claim of structural defect).
- Video walk-around of the entire damage area, narrating what you’re seeing.
- Photos of any debris or limbs on your roof or in your gutters.
- Photos of the property line markers if visible, so the location of the fall is documented.
- Photos of your neighbor’s side as well, if the tree crosses onto their property and they’re willing to share access – but only with their permission.
Time-stamped photos are best. Most modern phones embed timestamp and GPS data automatically, which can matter later if there’s any dispute about when the damage occurred. Don’t delete any of this for at least a year.
Step 3 – Understand California’s Property Line Tree Rules
California has well-established rules about trees that fall across property lines, and they don’t always work the way people expect. The key concepts:
Whose tree is it?
A tree is considered to belong to the property where the trunk emerges from the ground, regardless of where the canopy or roots extend. If the trunk is fully on your side of the line, it’s your tree. If it’s on the neighbor’s side, it’s theirs. If the trunk straddles the property line (called a “boundary tree” or “line tree”), both parties are co-owners under California law, and decisions about removal or major work generally require mutual consent.
Who pays for the damage?
Under California’s standard “act of God” insurance principle, when a healthy tree falls during a weather event and lands on a neighbor’s property, the homeowner whose property was damaged typically files the claim against their own insurance – not the tree owner’s. This surprises a lot of people. The exception is when the tree was clearly hazardous and the owner had been notified or should reasonably have known it was a risk. In those cases, the tree owner may be held liable, and homeowners insurance disputes between neighbors can get complicated.
Who pays for the removal?
Generally, each property owner is responsible for removing the parts of the tree that land on their own property. If a neighbor’s tree falls onto your side, removing your side is your responsibility (and your insurance company’s, if the tree damaged a covered structure). The neighbor handles the parts on their side. This is the most common source of confusion, and it’s worth knowing before you assume someone else is paying.
Special cases:
- If the tree damaged a covered structure on your property – house, garage, fence, pool enclosure – your homeowners insurance typically covers removal of the parts on your side, regardless of whose tree it was.
- If the tree fell in the yard but didn’t hit anything covered, removal is usually not covered by insurance.
- If the tree owner can be shown to have negligently maintained a known-hazardous tree, liability may shift to them – but this requires evidence.
- Boundary (line) trees are co-owned, and the costs and decisions are typically shared.
Step 4 – Talk to Your Neighbor (Carefully)
If the tree spans the line, you need to communicate with your neighbor, but how you do it matters. Some practical guidance:
- Reach out in writing (text or email) as well as in person, so there’s a record of the conversation.
- Stick to the facts. Document what happened, what you’re doing on your side, and ask what they’re planning on theirs.
- Don’t accept or assign blame in the first conversation. Insurance and liability decisions belong to adjusters and attorneys, not driveway conversations.
- Confirm logistics – whose tree service will work on which side, whether you’ll need access to each other’s yards, what the timeline looks like.
- If the neighbor is uncooperative or hostile, document the interaction and let your insurance adjuster handle further communication.
- If the situation seems likely to escalate into a dispute, consult a real estate or property attorney before making decisions you can’t undo.
Step 5 – Call Your Insurance Company
Most California homeowners insurance carriers have 24-hour claim lines. Call within hours of the event, not days, for two reasons: first, claim timelines have policy-defined deadlines, and second, faster reporting tends to produce smoother claim resolution. When you call:
- Have your policy number ready.
- Describe the situation factually: when it happened, what was damaged, whether anyone was injured, and whether there are immediate safety hazards.
- Ask whether you should hire a tree service directly or wait for an adjuster to inspect first. Most carriers want you to mitigate further damage (tarping a roof, removing hanging limbs) but to leave the major work alone until they’ve documented it.
- Ask about your deductible and what’s covered.
- Get the claim number and adjuster’s contact information.
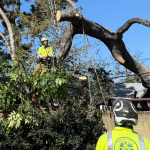
Step 6 – Get a Professional Tree Service On-Site
Once safety and insurance are handled, the next step is getting the tree off your property safely. A few things to know:
- Don’t attempt cutting yourself. Fallen trees are full of trapped tension – wood that’s stretched and compressed in directions it wasn’t designed for – and a wrong cut can release that stored energy violently. Tree-related chainsaw injuries from amateur storm cleanup are one of the most consistent emergency-room categories in California after Santa Ana events.
- Don’t sign anything from door-knockers. After major weather events in the San Gabriel Valley, traveling crews flood the area offering cheap immediate cleanup. Many are uninsured, unlicensed, and gone before anything goes wrong. Verify license, insurance, and references before hiring anyone.
- Use a licensed, insured, ISA Certified tree service. Ask for a current certificate of insurance before any work starts. A legitimate company will provide it on request.
- Get a written estimate, not a verbal one. For insurance work, the company should be able to provide itemized estimates and photo documentation suitable for adjusters.
- Confirm what’s included in the price – cutting, hauling, stump grinding, full cleanup, or just some of those.
Step 7 – Watch for Secondary Issues
Even after the tree is gone, the situation isn’t necessarily over. In the days and weeks that follow:
- Watch for delayed roof leaks. Trees on roofs can shift shingles and damage underlayment in ways that don’t leak until the next rain. Inspect ceilings, attic spaces, and the roof itself after the next significant rainfall.
- Monitor surrounding trees. Trees adjacent to one that failed are often under similar stress (same soil conditions, same wind exposure) and may need evaluation.
- Check fencing and hardscape for damage that wasn’t obvious at first.
- Document any new symptoms or damage that appears later, in case it needs to be added to the claim.
Get Professional Help
ArborWorld provides 24/7 emergency response for fallen trees across La Verne and the San Gabriel Valley. ISA Certified Arborists, licensed and insured crews, and full insurance documentation support. Call (626) 779-8786 any time – a real person answers.